Requirements: ffmpeg and gcc 4.4.6 or later
How To Use
There are 3 different versions of this program. A serial version and two parallel versions sporting Open MPI and OpenMP support respectively are included.
There is a makefile setup to easily demonstrate this program, but a few variables must be setup correctly.
In the test directory, there is a script for omp, mpi, and serial processing. Each script has two variables that need to be set along with other options such as threads and color/grayscale. Edit your path and home directory in the respective script to make sure it runs without a hitch. Once done type:
| Command | Description |
|---|---|
| make | compiles all programs |
| make simulation | for serial processing |
| make simulation-omp | for openMP processing |
| make simulation-mpi | for Open MPI processing |
The programs may also be run independently of the scripts if you want more control.
The OpenMP and MPI version have the following usage.
particleSimulator-omp input [file] dt [0 < x < 1] numSteps [1|2|…] output [file] threads [1|2|…] time [0|1]
particleSimulator-mpi input [file] dt [0 < x < 1] numSteps [1|2|…] output [file] threads [1|2|…] time [0|1]
The serial version has the following usage.
particleSimulator-serial input [file] dt [0 < x < 1] numSteps [1|2|…] output [file] time [0|1]
If you want to time the processing, just put a one for time, and if not, just put a 0. The dt argument accepts doubles, and numsteps, threads and time accept ints. The input file must be in the following format:
[X Position] [Y Position] [X Velocity] [Y Velocity] [Particle Mass]
0.533480 0.309789 -0.021902 0.787174 1.719489
Both Position and Velocity must be between -1 and 1 and the mass can be anything above 0, preferably a low number below 10. The gravitional constant is not tuned for large numbers. The output generated will look exactly like the input. There are three helper programs included in this release.
ParticleToPgm
Converts the particles into a grayscale PGM image to be used with ffmpeg or to create a jpg image.
particleToPgm input [file] xmin -1 xmax 1 ymin -1 ymax 1 xres 1280 yres 720 output [file]
ParticleToPpm
Converts the particles into a color PPM image to be used with ffmpeg or to create a jpg image.
particleToPpm input [file] xmin -1 xmax 1 ymin -1 ymax 1 xres 1280 yres 720 output [file]
ParticleMaker
Creates a certain number of particles and prints in particle.01.data
particlemaker [# of particles]
Each test used 300 timesteps.
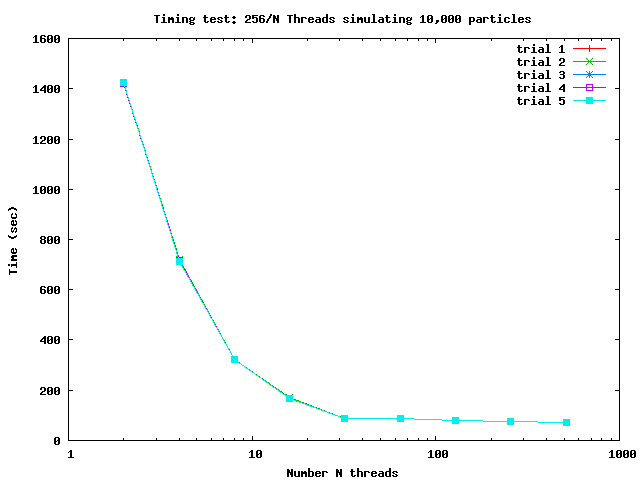
These tests used 48 processors on chi in the Newton Cluster. There was not a upward slope in time with even up to 512 threads with 48 processors. Since the processing amount per thread decreases as more threads are added, ideally there would be a increase in time, but this seems not to be the case. The fastest average time was about 71.9 seconds processing 10,000 particles.
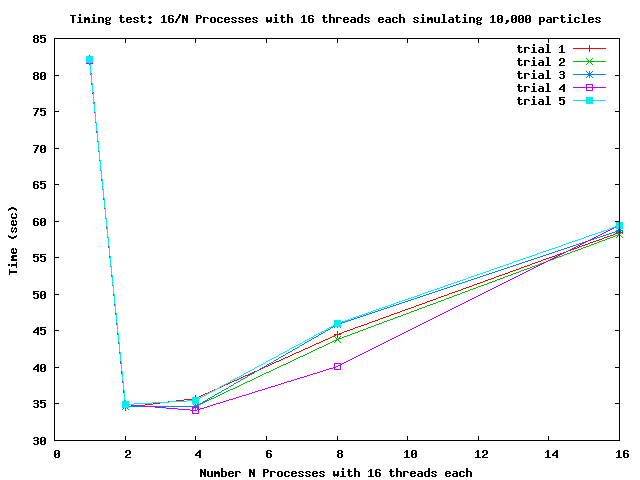
These test takes advantage of Open MPI for the processing. In these results, up to 16 processes were ran with each having 16 threads. In comparison with OpenMP, processing time was increased in all respects. There was a huge performance increase with 2 and 4 processes which was about 34.6 seconds. These tests do show a upward sloping graph as more processes are added due to the Open MPI overhead with each process getting a smaller particle amount.
Acknowledgements
plotScript.gnu and parseFlags This gnuplot script, used to create the graphs, and parseFlags were written by Dr. David Banks. Permission to use in this assignment was given.
Midpoint Circle Algorithm was used in the creation of a PPM or PGM image.
Included in this release is a special version of the openMP program that instead of accepting a double as an argument for dt, it accepts a file. This file follows this format:
0 .01
50 .001
100 .0005
150 .001
The first number of the line is an int of the timestep you want the dt to change. The second number is the dt you want to be set for that timestep and beyond.
This version has the following usage:
particleSimulator-special input [file] dt [file] numSteps [1|2|...] output [file] threads [1|2|...] time [0|1]
The makfile is setup to work with the simulation as well. First you must change the variables, as above. The script also uses the dt file in dt.tx, so make sure you make that file with the dt adjustments. Once finished type:
make simulation-special

